Browse
- Acid
- Afro-House
- Bass House
- Big Room
- Breaks
- Deep-House
- Drum & Bass
- Dubstep
- Electro House
- Electronica / Downtempo
- Events
- Funk / Soul / Disco
- Funky / Groove / Jackin' House
- Future House
- Garage / Bassline / Grime
- Hard Dance
- Hardcore / Hard Techno
- Hip-Hop / Rap / Reggae
- House
- Indie Dance / Nu Disco
- Info
- Leftfield Bass
- Leftfield House & Techno
- Melodic House & Techno
- Minimal
- Minimal / Deep Tech
- Progressive
- Progressive House
- Psy-Trance
- RadioLDN Records
- Tech
- Tech-House
- Techno
- Tekno
- Trance
- Trap / Future Bass
Latest Posts
How to connect BUTT Encoder with SHOUTcast and IceCast
1.) First, you will need to download and install the BUTT Encoder. You can Download it Here
When you start Butt Encoder for the first time, it automatically creates a default configuration file in your computers home directory. Any changes that you later make will then get written to this file. .
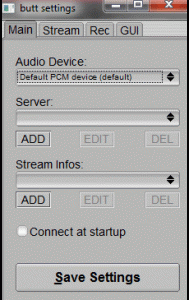
2.) Within the ‘BUTT Settings’ which opens within a new window, under the ‘Main’ tab you can edit the following information:
Audio Device: Here you can specify the soundcard that you wish to use.
Server: This is where you can choose from your added servers. This can be useful if you use more than one server account for streaming.
Stream Infos: This is where you can edit your stream information such as the stream title, description, genre, website URL and various instant messenger contact details.
Connect at startup: Here you can specify with the checkbox if you wish for BUTT Encoder to automatically connect to a server upon the programs startup.
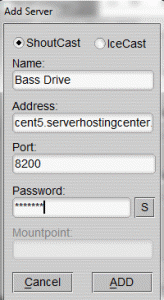
3.) To add a server, click on the ‘ADD’ button underneath the ‘Server’ tab, this will then open up another new window. Here you can specify your server details.
Name: Here you can name your server for the drop down list. If you use more than one server account and type this allows you to quickly change between them.
Address: Here you input your servers hostname.
Port: Here you input your provided port number.
Password: Here you input your user password.
Mount Point: /live (you only need to include a mount point if you are using Icecast)
4.) Once you have completed the server information click on the ‘Save’ button to add this to the server list. The ‘Edit’ button under ‘Server’ on the ‘Main’ tab can be used to alter this information at a later time if required and the ‘Delete’ button can be used to remove any that you no longer require.
5.) Editing your stream information:
Edit Server Infos: This is where you can edit your stream information such as the stream title, description, genre, website URL and various instant messenger contact details.
Click on the ‘Add’ button underneath the ‘Stream Infos’ tab to add a servers stream information. As with the server accounts, you can create multiple stream information settings which can be useful if you use more than one server account for streaming. The ‘Edit’ button can be used to alter this information at a later time if required and the ‘Delete’ button can be used to remove any that you no longer require.
There is a check box for ‘Make Server Public’, we recommend that you tick this box unless you wish for your stream to remain private.
6.) Configuring the stream settings:
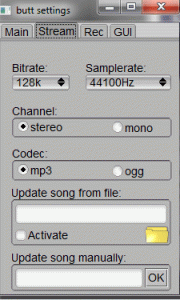
Under the ‘Stream’ tab you will require the following settings:
Bitrate: 320k or whatever bit rate you are streaming at.
SampleRate: 44100Hz (Default)
Channels: Stereo (Default)
Codec: MP3
7.) When you have completed all of your settings, click on the ‘Save Settings’ button, BUTT Encoder will then save all of the changes that you have made. These changes will get written to the default configuration file that we mentioned earlier.
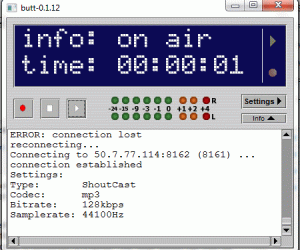
8.) When you have completed adding your server and editing all of your stream information, to start streaming with BUTT Encoder just click on the ‘Play’ button on the main interface. This will then connect to the specified server. The yellow play symbol in the main interface will be lit up once BUTT Encoder is connected to a server. The ‘Stop’ button can then be used at anytime to disconnect from the server. We recommend always keeping an eye on your levels with its built in VU meter to make sure that the audio signal is never in the red and causing any kind of distortion.
Share this linkCategories Tag
Shoutbox
-
( Sending... )
-
H.A.R.M ENTertainment(Wednesday, Mar 5. 2025 02:04 PM)
-
NMA(Monday, Mar 17. 2025 03:30 PM)Thanks for addiing my mix!
-
David(Wednesday, Mar 26. 2025 11:43 AM)Loving Joey Salgero’s new Kitchen Disco mix, quality stuff as usual from this great DJ
-
Tony shelton DJ(Tuesday, Jun 10. 2025 06:21 AM)Thanks for uploading my mix , very excited , got loads to share with you all
-
Chrome_doubt(Thursday, Jun 26. 2025 07:34 PM)Thank you for posting my mix up on your site, greatly appreciated . A million thanks to you guys … cheers
| Name: | |
| Email: | |
| For: |  |
|
Mail will not be published
|


Thank you for supporting Creepzz on your station. https://radioldn.co.uk/creepzz-take-the-rain/